Campaigns
Choosing AI or Template for each email in the sequence, writing prompts and templates, scheduling and auto-approve, activation requirements, and what the analytics tab tracks.
A campaign is a sequence of emails sent to a group of leads on a schedule. This guide covers how to set one up end to end — from creating it through activating it.
Creating a campaign
From Campaigns, click Create Campaign and give it a name. You're taken straight to the campaign's Settings tab to finish setup.
Choosing how each email is written
Open the campaign's Emails tab. Each email in the sequence — Email 1, Email 2, and so on — has its own AI / Template toggle, so a single campaign can mix both: an AI-personalized opener followed by a template-based breakup email, for instance.
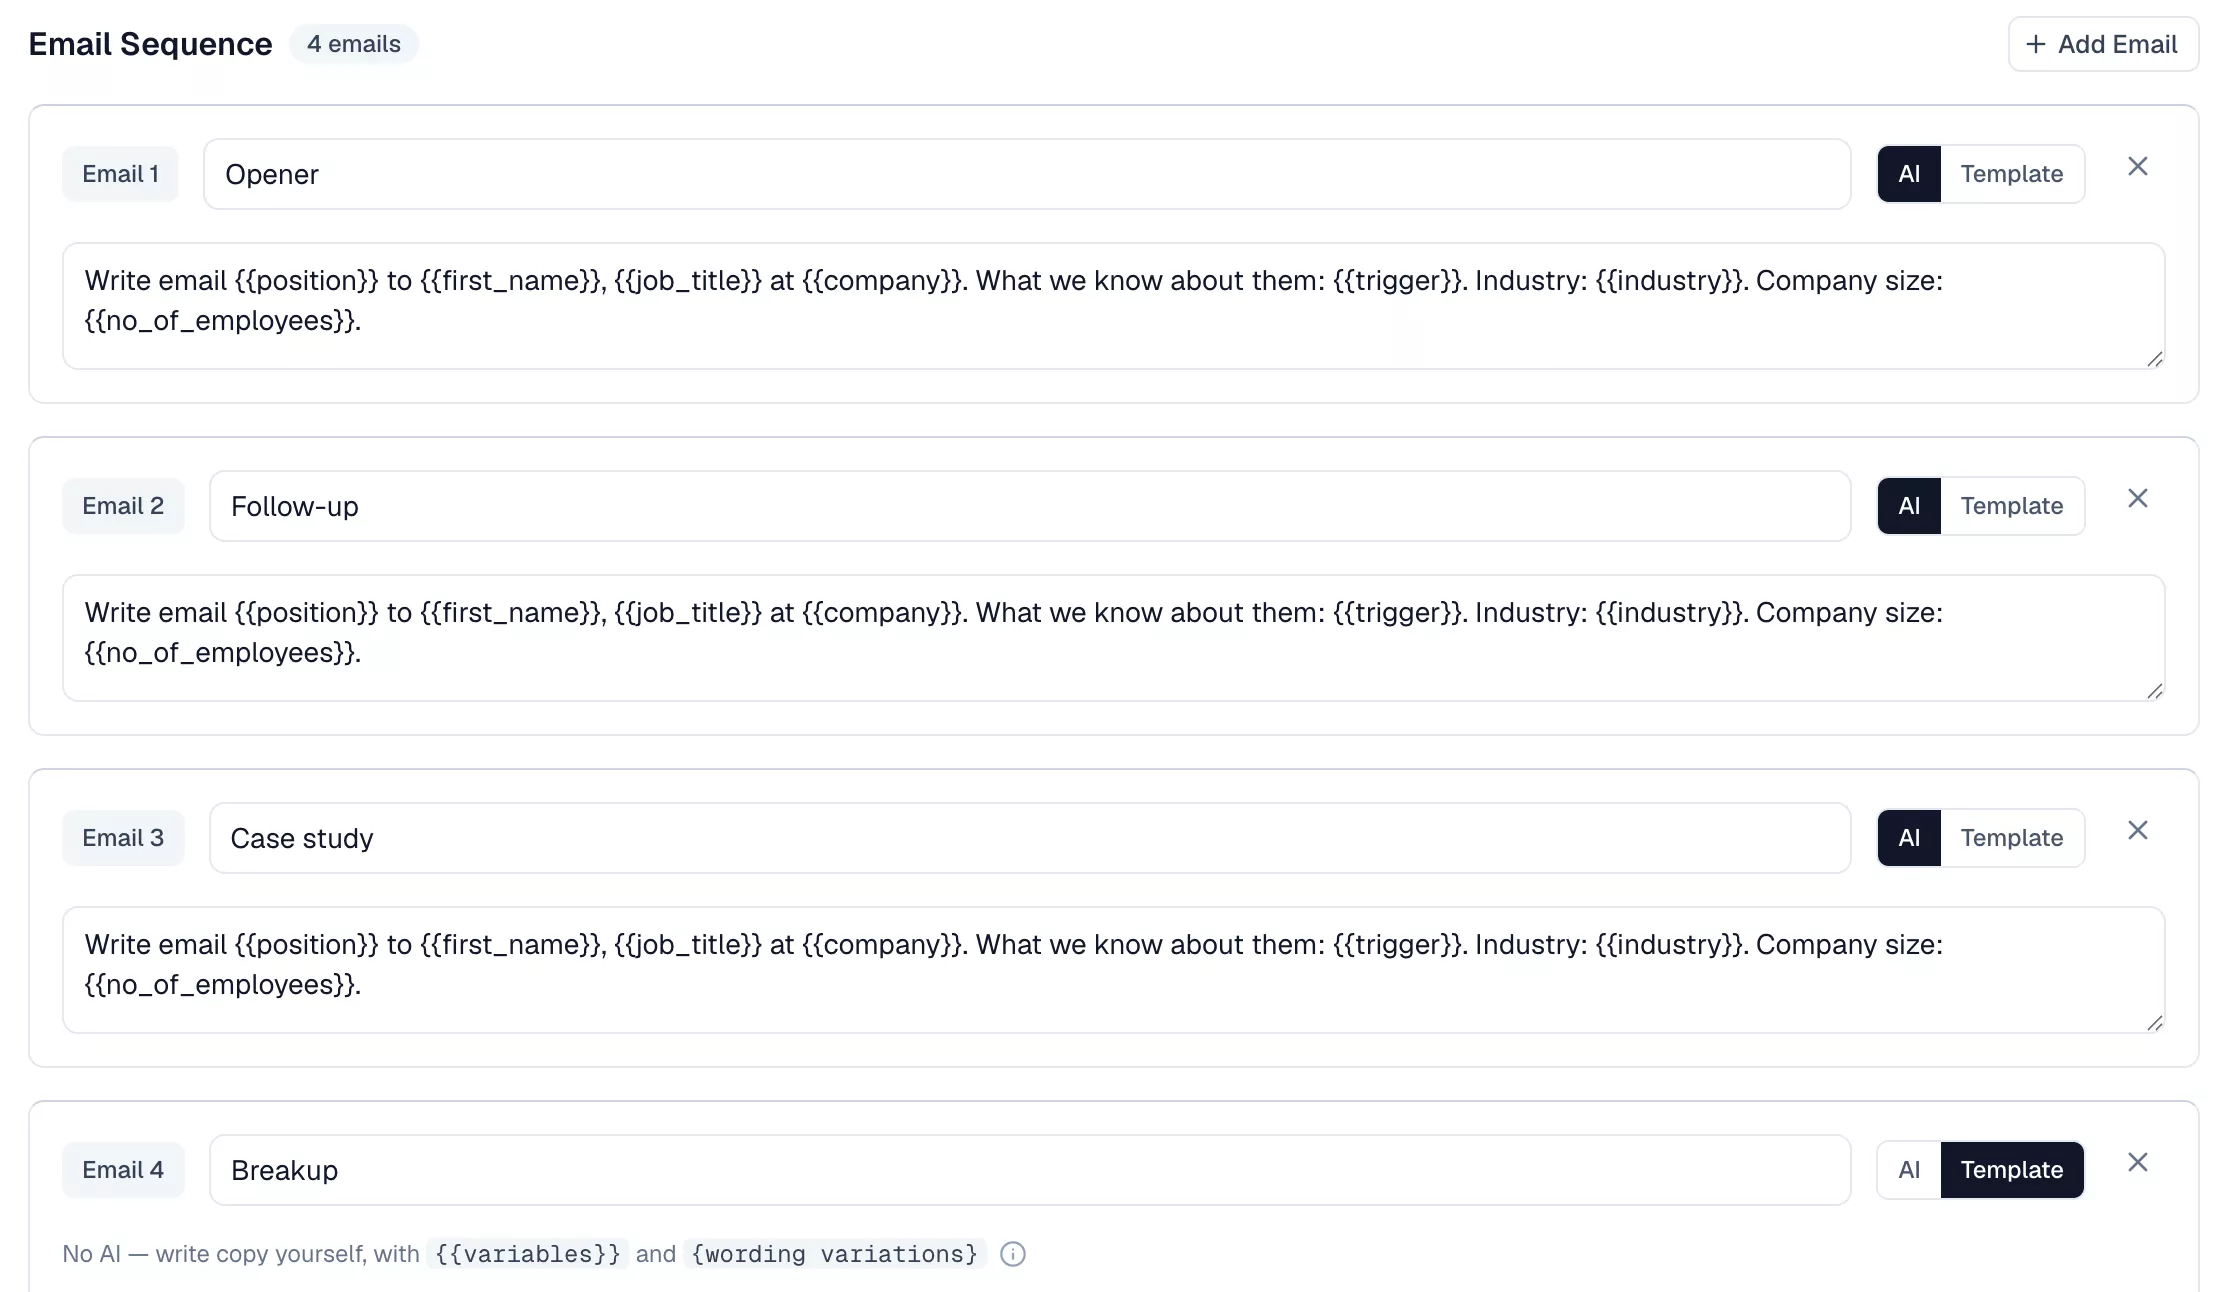
The choice also decides whether that email costs anything: an AI position costs 5 Flinter Credits each time one is written, while a Template position costs nothing. See Plans and Credits.
Whichever you choose, your sender's signature and an unsubscribe line ("reply STOP") are added automatically to the end of every email. You won't see them in the editor, but every recipient gets them — so don't write a sign-off or an opt-out line yourself.
AI-drafted emails
For a position set to AI, you'll write:
- A System Prompt — shared across every AI-drafted email in the sequence, describing the overall instructions and tone. It applies to every AI position, so it can't be left empty if at least one position uses AI.
- A per-email prompt for that position, answering "What angle should this email take?" — e.g. the first email might introduce your offer, the second might follow up on a specific pain point.
- A step name (e.g. "Introduction," "Follow-up") — purely for your own organization, not sent to the lead.
The AI uses the system prompt, the per-email prompt, any signals the lead has (from enriching it) and its trigger data, and — for emails after the first — the previously sent emails in the sequence, so it won't repeat itself.
What the AI already knows about each lead
You don't need to feed the lead's details into your prompts. Every email is drafted with this supplied automatically:
- From the lead — first and last name, email address, job title, location, LinkedIn URL, and the free-text trigger you imported
- From their company — company name, website, LinkedIn URL, industry, number of employees, and description
- Any signals the lead or their company has, if you've enriched them
- Which email in the sequence this is, and for emails after the first, the ones already sent
- The language to write in — the lead's own Preferred Language if it has one, otherwise the campaign's Email language (see Campaign settings)
Fields you didn't import are marked as missing rather than left blank, so you can tell the AI what to do when something isn't there — for example, to write around a missing job title instead of guessing at one.
This is what your prompts should be for: how to use that information, not what it is. Write the angle, the tone, the length, what to avoid, and what a good ask looks like. A prompt that restates the lead's job title or company name is spending words on something the AI can already see — and there's no need to insert merge variables into an AI prompt the way you would in a template.
Template emails
For a position set to Template, you'll get Subject and Body fields instead of a prompt.
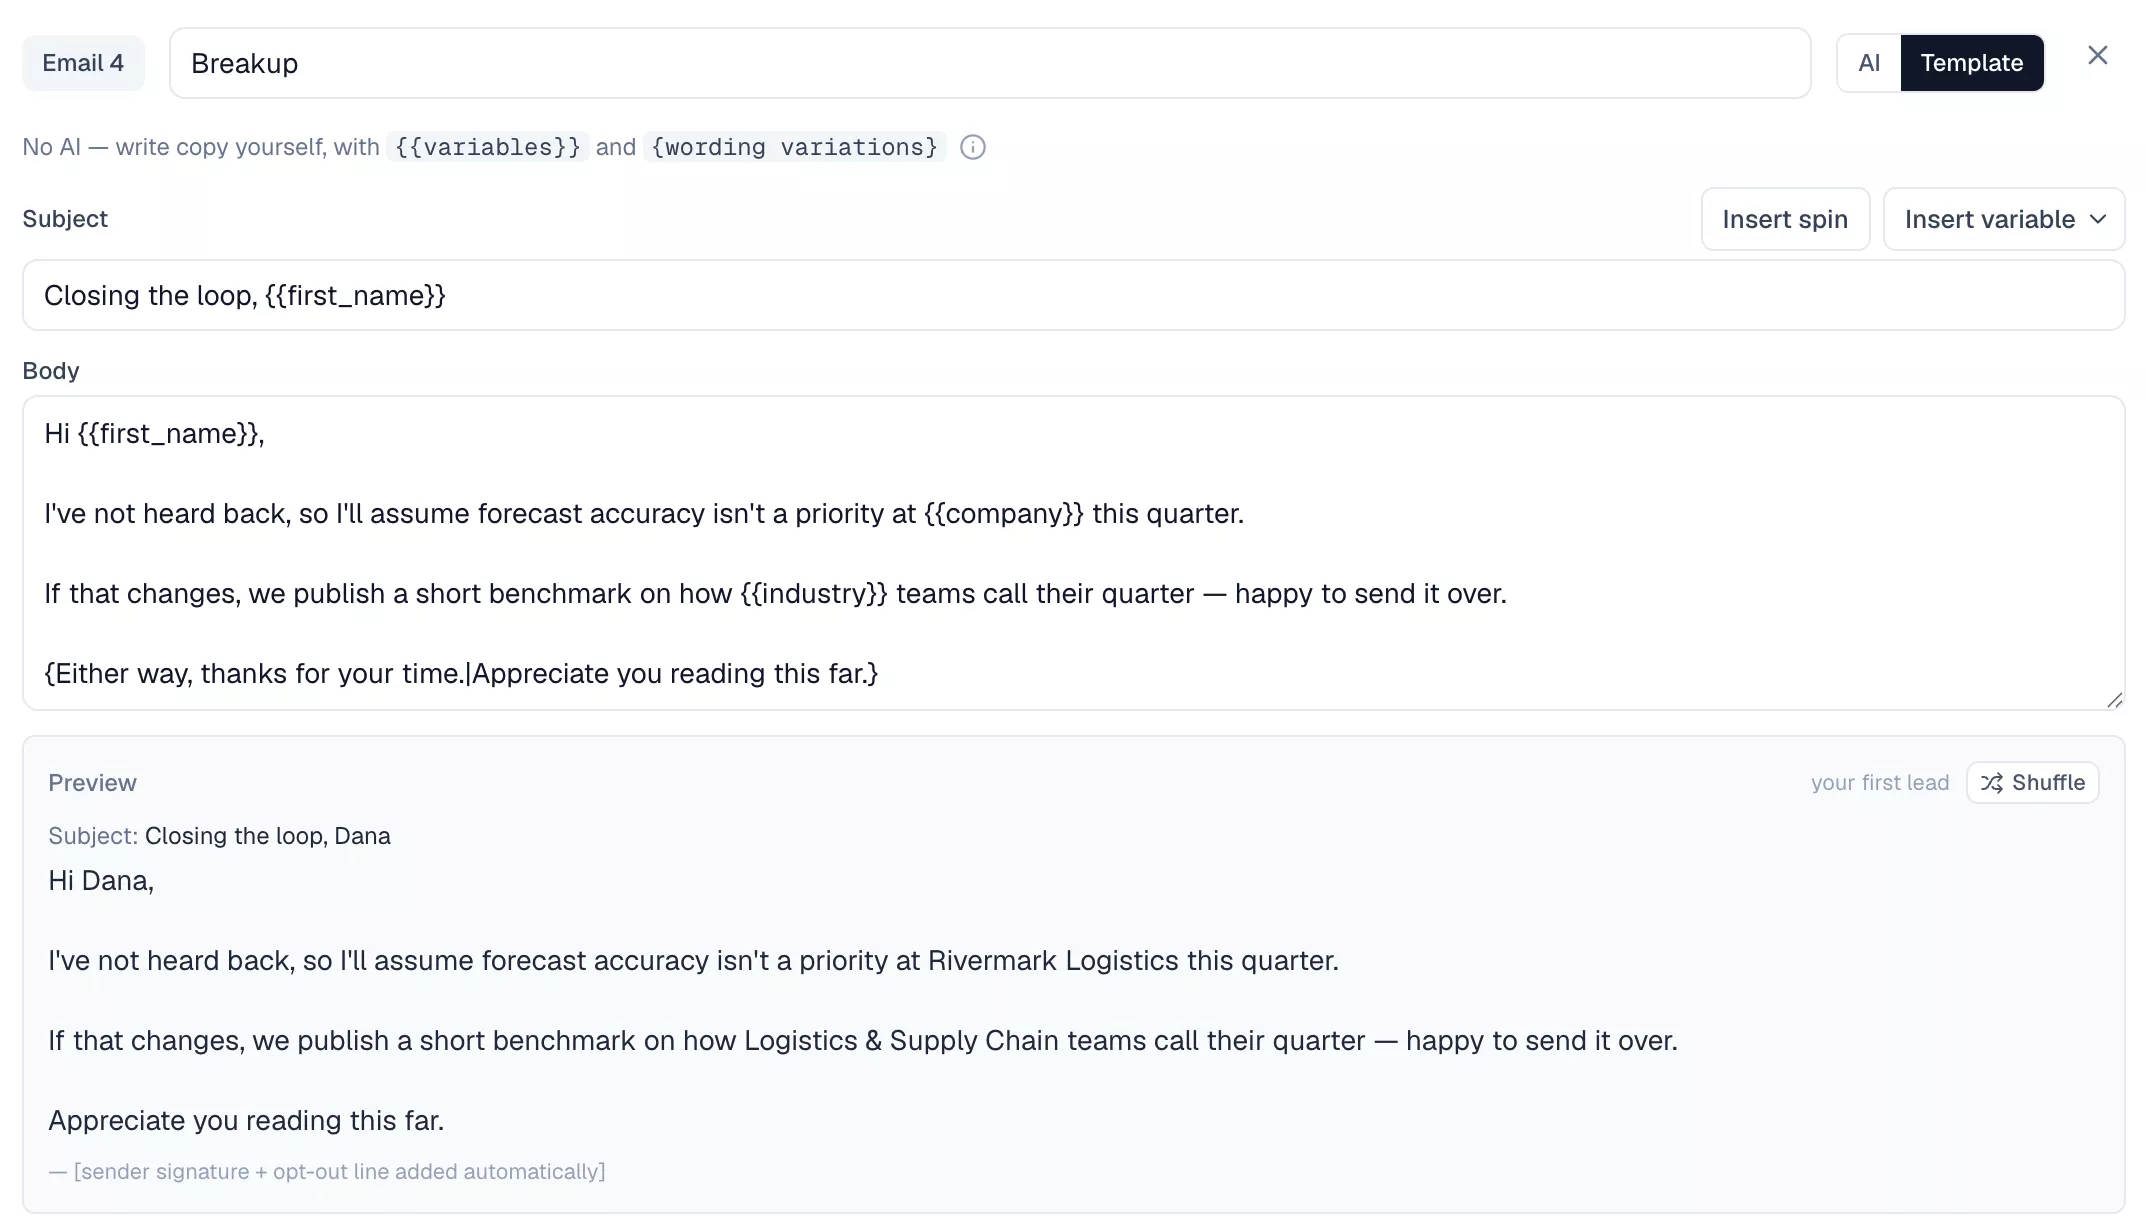
A preview below the fields renders the email against one of your real leads, with merge variables filled in and one wording variation chosen. Shuffle re-rolls it.
Merge variables
Insert a personalization field using the Insert variable dropdown, or type it directly:
{{first_name}}
{{job_title | there}}
The syntax is {{field}} or {{field | fallback}}. If the lead has a value for that field, it's used; otherwise the fallback text is used (or nothing, if you didn't set one). A lead missing job_title with {{job_title | there}} in the subject would render as there — never a broken {{job_title}} left in the sent email.
Spintax (optional variation)
Click Insert spin to add a randomized-choice block:
{Hi {{first_name}}|Hey {{first_name}}|Hello {{first_name}}}
One option is picked at random each time the email is generated for a lead — useful for avoiding identical-looking emails at scale. Spintax uses single curly braces with pipe-separated options; you can put a merge variable inside a spin option, but you can't nest spintax inside spintax (a nested attempt is left as plain text rather than partially resolved, so it fails safely).
Use the live preview panel — rendered against a real sample lead — to check how your template looks, and click Shuffle to re-roll spintax and see a different random combination.
Campaign settings
The Settings tab covers everything that isn't the email copy itself:
- Gap between emails — how many days to wait between one email in the sequence and the next (defaults to 3).
- Auto-approve — when on, generated emails skip manual review and move straight to Approved. Leave it off if you want to read every email before it sends, especially early on.
- Target Persona (override) — describes who this campaign's enrichment should research and write signals for, and who the AI is writing to. Leave it blank to use your workspace-wide persona from Settings, or set one here to override it for this campaign specifically.
- Email language — the language this campaign's AI-drafted emails are written in, for any lead that doesn't have its own Preferred Language from import (see Leads). A lead's own language always takes priority. Defaults to English (US) — default. It applies only to emails set to AI — template emails are sent exactly as you wrote them — and to drafts generated after you save, so emails already drafted keep their language. The opt-out line is always added in English, and so is the default sign-off; a Signature you've set on the sender is added exactly as you wrote it.
- Send schedule — by default, campaigns use your workspace's default sending days, hours, and timezone (set in Settings). Check Override workspace default send days/hours/timezone to set different days, hours, or timezone for this campaign specifically.
- Senders — use Add senders to choose which connected mailbox(es) send this campaign's emails. A sender can be shared across multiple campaigns. Remove takes one off this campaign only: it stays connected, keeps sending for its other campaigns, and its replies are still checked. Leads it has already emailed here are paused, and leads it hasn't emailed yet can be moved to any other connected sender — the confirmation dialog shows the counts and lets you choose. Picking one that isn't on this campaign yet adds it. If you remove the campaign's only sender without choosing a replacement, the campaign is paused too, since it has nothing left to send from.
Want a romanized style such as Hinglish (Hindi written in English letters)? Leave Email language at English (US) — default and ask for it in your prompts. Choosing a language like Hindi here overrides that instruction and writes in native script instead.
Activating a campaign
A campaign only sends once it's Active — toggle this from Draft to Active on the Settings tab. Flinter checks a few things first and will list anything missing in a confirmation dialog before letting you activate:
- At least one lead enrolled in the campaign
- At least one connected sender assigned
- Every Template position has a body written; every AI position has an effective prompt (its own, or the system prompt as a fallback)
- A non-empty system prompt, if at least one position is set to AI
- A gap between emails greater than zero
An active campaign can also stall for a reason that isn't a setting: if your workspace has run out of Flinter Credits, campaigns with AI-drafted positions show a No credits label next to their status on the Campaigns list. They stay Active, keep sending emails already written, and start drafting again on their own once credits are available — there's nothing to switch back on. Campaigns whose every position is Template are unaffected, since Template emails cost no credits. See Plans and Credits.
You can pause an active campaign at any time from the same toggle — paused campaigns stop generating and sending new emails but keep their history intact. Resuming re-checks the same conditions, so a campaign that lost something while it was paused (its last sender, for instance) tells you what to fix rather than going back to Active without it. Deleting a campaign is available from the same tab and is permanent.
Analytics
The campaign's Analytics tab opens with five figures: Leads Enrolled, Emails Sent, Reply Rate, Positive Reply Rate — interested and referral replies as a share of enrolled leads — and Pending Approval, highlighted because it is the one that needs you rather than the campaign.
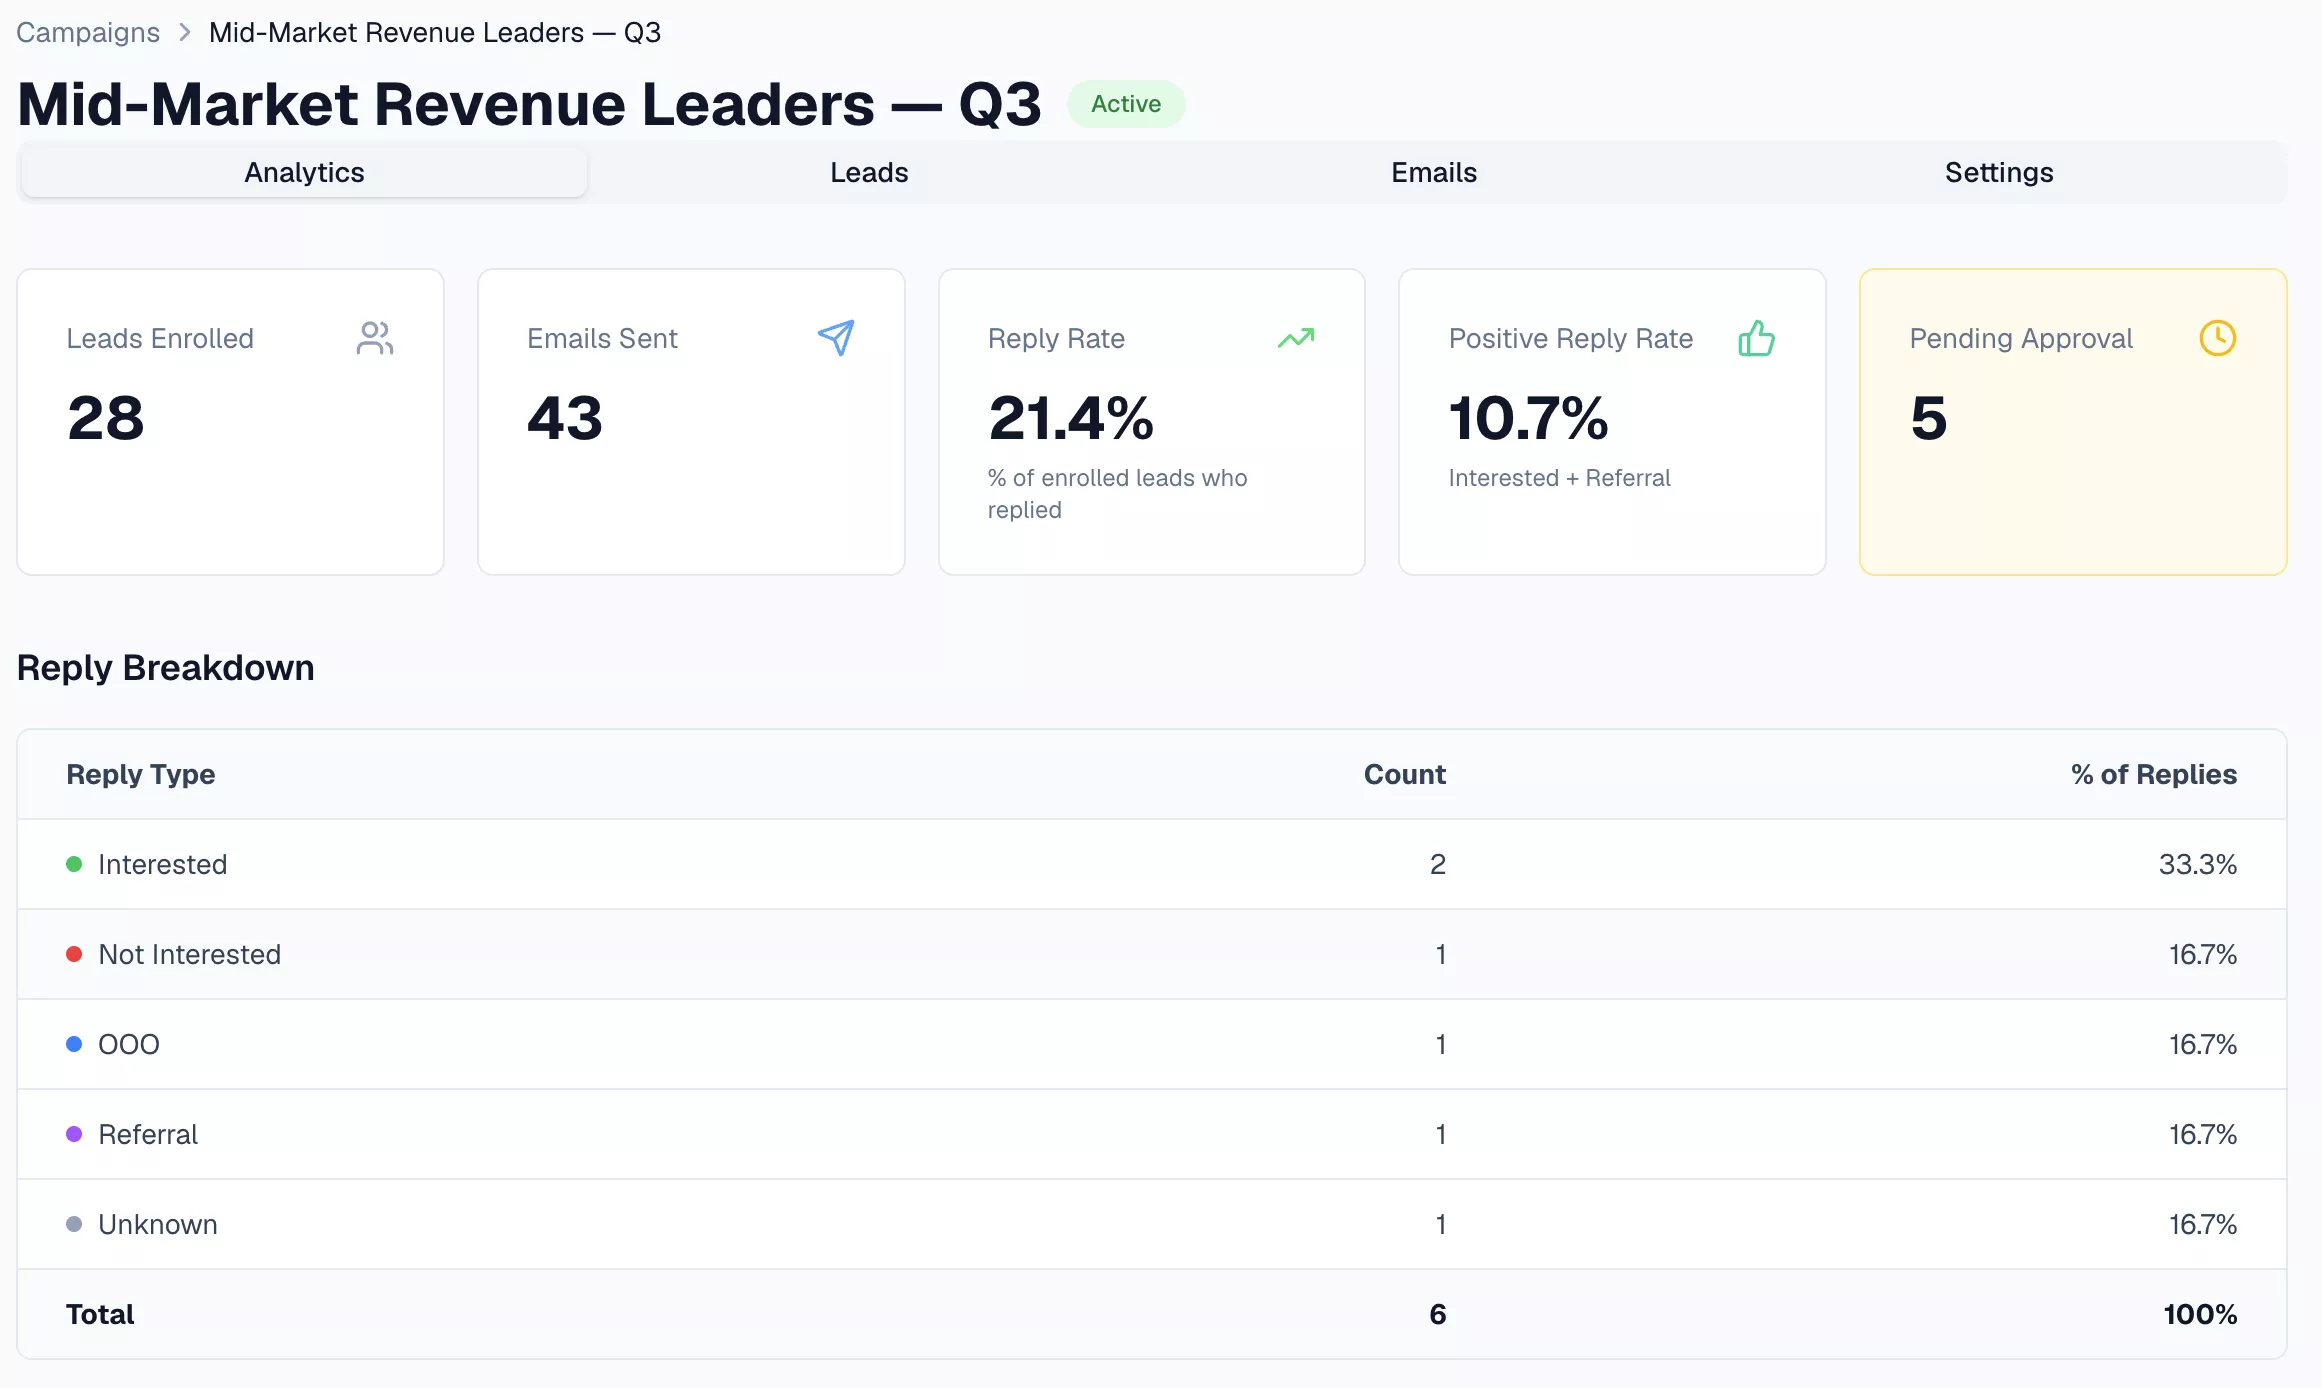
Below them, Reply Breakdown counts replies by classification, so you can tell a campaign that is landing from one that is merely generating out-of-office notices. Email Funnel follows further down, tracking each position in the sequence from generated through approved, sent and replied — which is where you see whether a particular step is losing people.
Related docs
- Plans and Credits — AI positions cost credits; Template positions don't.
- Senders — connecting a mailbox, send limits, and removing a sender.
- Leads
- Inbox
- Getting Started