Leads
How to import, enrich, and manage leads inside a campaign, and how to search and filter leads across every campaign from the Leads page.
Flinter shows leads in two different places, and they're not interchangeable — one is for browsing across every campaign, the other is where you actually manage a lead.
Adding leads to a campaign
Open the campaign's Leads tab
From inside a campaign, switch to its Leads tab, then click Add Leads.
Upload your CSV
Upload a CSV of the people you want to reach out to.
Map your columns
Flinter auto-matches your CSV columns to its own fields where it can. Email and First Name are required; everything else — Last Name, Job Title, Lead Location, LinkedIn URL, Preferred Language, Company, Website, Industry, No. of Employees, Company Description, Company LinkedIn URL, Company City, Company Country, and a free-text Trigger field — is optional.
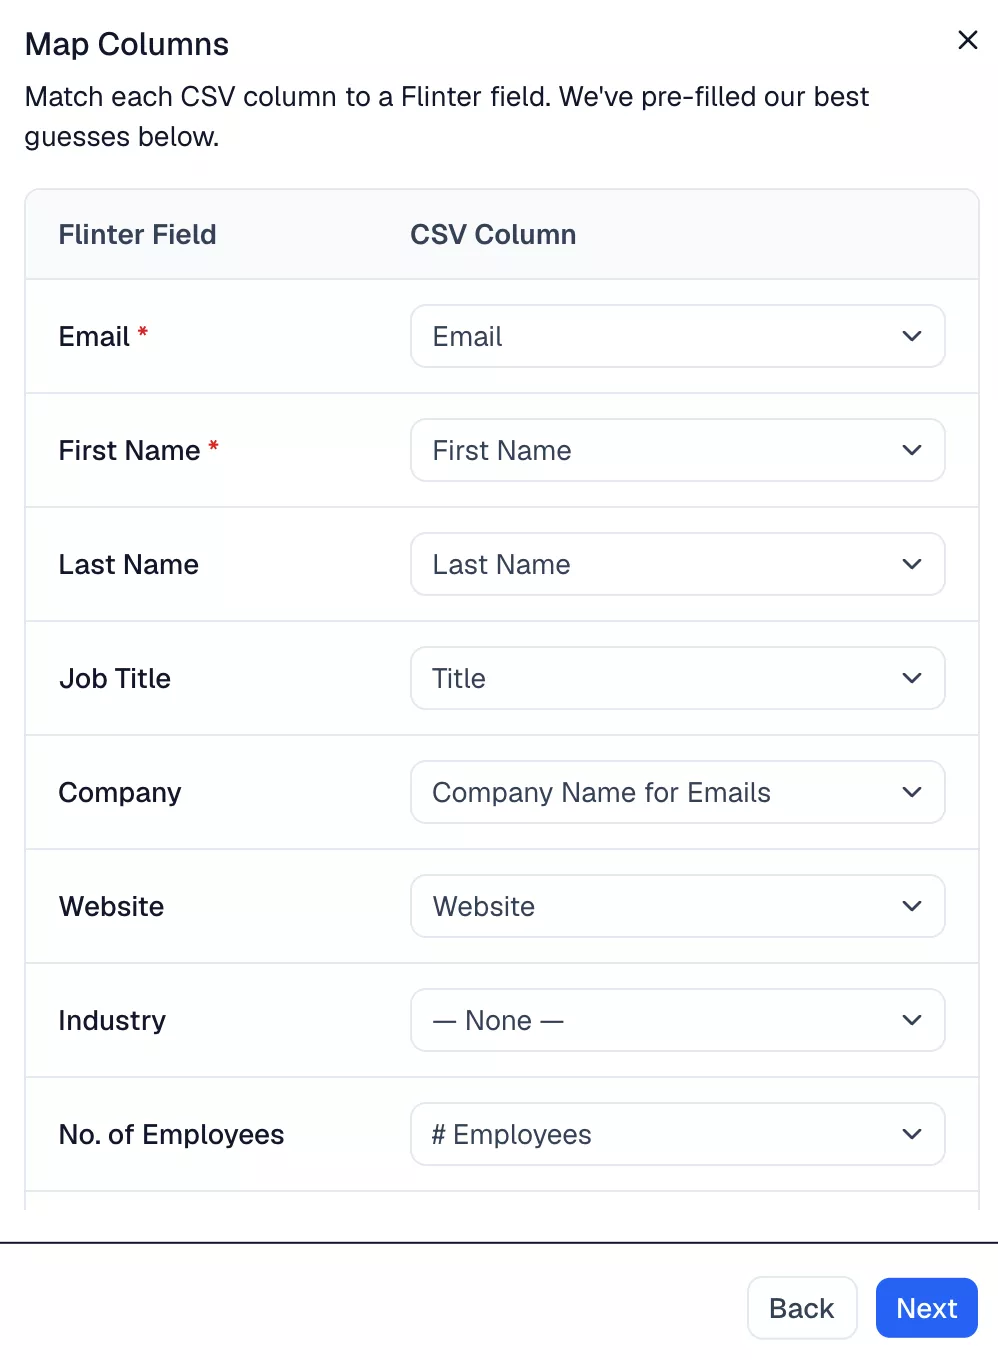
Flinter's guesses are shown pre-filled — "Title" matched to Job Title, "Company Name for Emails" to Company — and any of them can be changed. A field left at — None — is simply not imported.
Some fields describe the person and some describe their company, which is why two of them mention location. Lead Location is where the contact is; Company City and Company Country are where the company is. They're often the same, and mapping one doesn't require mapping the others.
Preferred Language sets the language this lead's AI-drafted emails are written in. Write the language's name in English or in its own script ("Hindi" or "हिन्दी"), or its code ("hi"). Supported languages are English (US), Hindi, Marathi, Tamil, Telugu, Kannada, Malayalam, Bengali, Gujarati, Punjabi and Odia. A blank cell means no preference, so the campaign's Email language applies — see Campaigns. To write a whole campaign in one language, set it there rather than filling the column on every row.
Any CSV column you don't map to a Flinter field is silently dropped — it won't show up anywhere later. Double-check the mapping before continuing.
Preview and import
Review the preview, then click Import N Leads to finish.
Three optional settings sit above the button, all off by default. The first two decide which leads get imported:
- Only import leads that aren't in any campaign yet — keeps the import to genuinely new prospects, skipping anyone already in another campaign whatever its status.
- Exclude leads who marked not-interested in other campaigns — skips anyone who replied not-interested anywhere else in the workspace. The option above already covers these, so it's disabled while that one is ticked.
The third decides what an imported row overwrites on a lead your workspace already has:
- Erase details left blank in this file — for a lead you already have, an empty cell in your CSV deletes the stored value instead of keeping it. It only ever touches fields you mapped on the previous step: anything you left unmapped is untouched either way. Company details are never erased this way, only the lead's own.
Left unticked — the default — a blank cell keeps whatever Flinter already has for that lead, so a partial CSV tops up missing details without erasing the rest.
Bounced and unsubscribed addresses are always excluded, whatever you pick here. The import summary reports how many leads each filter skipped.
If a Preferred Language cell holds something Flinter doesn't recognize — "Tamil Nadu", say — the preview flags it before you import. Those rows still import, and the unrecognized value is ignored: a lead that already had a language keeps it, and any other uses the campaign's Email language.
A lead that's already in this campaign is skipped entirely, reported as "already in this campaign" — so re-importing the same file into the same campaign won't update those leads' details either way.
If the same email address appears more than once in your file, only the first row is used and the rest are reported separately as "duplicate rows in your file". Every row lands in exactly one category, so the counts always add up to the number of rows you uploaded.
If the import would take you past your plan's contact limits, the leads that don't fit aren't imported and a separate message tells you which limit was reached. Re-importing an email address you already have doesn't count against your uploaded limit, and a lead that's already in another campaign doesn't take a new active slot. See Plans and Credits.
Managing leads in a campaign
The Leads tab's table has a search box, a status filter, an Enrichment Status filter (All Enrichment Statuses, Pending, Enriched, No signals found, Retrying), and sortable Name/Company/Status/Email Position/Last Sent columns.
- Select leads with the row checkboxes to reveal a bulk action bar: Pause, Resume, Remove from Campaign, or Enrich Selected (N).
- If more leads match your current filters than fit on one page, checking every row on the page reveals a Select all N matching link — selecting every matching lead across every page in one action, up to 1,000 at a time. Past that, it becomes Select first 1,000 of N matching; act on that batch, then click it again to reach the rest.
- Per-lead actions are in the row's ⋮ menu: View Details, Pause Enrollment (if Active) or Resume Enrollment (if Paused), and Remove from Campaign.
- Removing a lead (single or bulk) asks for confirmation first — it stops that lead's enrollment in this campaign.
Enriching leads
Researching a lead costs credits, so enriching is a deliberate action you take on leads you select — it isn't tied to any particular campaign setup, and it's the only way a lead's signals get refreshed (there's no automatic re-check for staleness).
Enrich Selected (N) only appears once you've selected at least one lead — there's no way to enrich without an explicit selection. Clicking it shows a breakdown before anything runs — how many are already enriched, previously found no signals, never enriched, and so on — plus an "up to N credits" estimate and how many credits you have available, so you can see exactly what you're about to pay for and whether you can. A checkbox lets you also re-enrich leads that already have a result; by default those are skipped, since re-running them charges again. Bounced or unsubscribed leads, and any already mid-enrichment, are always excluded.
If the selection costs more credits than you have, the dialog says so and Enrich stays disabled until you select fewer leads — enrichment is never partly run, so the number you confirm is the number you get. Enrichment isn't available on the Free plan at all; the dialog says so and won't let you continue. See Plans and Credits.
You're charged 50 credits for a lead whenever the enrichment leaves it with signals to show — whether those came from researching the person or from their company. You aren't charged when nothing is found for the person and their company has nothing either, or when the lookup errors out. Re-enriching charges again, even if the findings repeat what was already there.
While enrichment is in progress, affected rows show an "Enriching…" badge that updates on its own once it resolves, and the tab also shows an "Enriching N leads…" indicator near the top even after you clear your selection.
Lead details
Click any row (or View Details from its menu) to open the lead's detail panel.
Details tab:
- Contact — email, a Deliverability badge, Job Title, Company, Location, Preferred language (shows Campaign default when the lead has none of its own), LinkedIn.
- Signals — every current researched finding for this lead, personal and company-level, each labeled with its type (e.g. Promotion, Funding) and source. Shows a note that none exist yet if the lead hasn't been enriched, or nothing was found.
- Enrollment — which campaign, this lead's position in the email sequence, which sender it's assigned to, and when it was enrolled.
If a lead's Deliverability isn't "Deliverable," a Reset to valid button appears — useful for a bounce you've confirmed was a false positive. Resetting an address that unsubscribed asks for an extra confirmation first, since re-contacting an opt-out can have compliance implications.
Activity tab: a timeline of every email sent to this lead and every reply received, each with its own status badge.
Understanding lead statuses
Flinter tracks two separate status concepts that use some overlapping words — worth telling apart:
Enrollment status (Active, Replied, Bounced, Unsubscribed, Complete, Paused) describes this lead's outcome in this one campaign. Deliverability (Deliverable, Bounced, Unsubscribed, Complained) describes the email address itself, globally, across every campaign it's ever been part of. A lead can show enrollment status "Bounced" in one campaign's Leads tab while its address-level Deliverability badge elsewhere also happens to say "Bounced" — same word, two different fields, and a Deliverability change (like a real bounce) is what actually blocks the address everywhere going forward.
The workspace-wide Leads page
The Leads page in the left navigation lists every lead across every campaign in the workspace, with search and three filters: Email Status (Deliverability, worded as "Valid" in the filter itself), Enrichment Status, and Campaign. It's the place to look up a lead without knowing which campaign it's in.
Related docs
- Plans and Credits — what enrichment costs and what the contact limits mean.
- Campaigns
- Getting Started