Senders
Connect an Outlook or Google Workspace mailbox, manage send limits and signatures, reconnect a sender if its connection breaks, and remove one you no longer use.
A sender is a mailbox your campaigns send from. This guide covers connecting one, what you can configure per sender, how to fix a broken connection, and how to remove a sender you no longer use.
How many senders you can connect
Lite and Pro have no limit — connect as many mailboxes as your sending needs. Free includes 1 and the trial includes 5. When a plan caps it, the Senders page shows how many you've used, and adding one past the limit is refused with a message saying so.
Moving to a lower plan never disconnects a mailbox you already have. See Plans and Credits.
Connecting a sender
Go to Senders
Open Senders from the left navigation, then click Add Sender.
Choose a provider
Pick Microsoft 365 / Outlook or Google Workspace. IMAP / SMTP is marked Coming Soon.
Both options are for a mailbox on your own company domain. Personal accounts — a @gmail.com address, or a personal Microsoft account like @outlook.com or @hotmail.com — can't be connected: enter one and the connect button stays disabled, with the reason shown under the Email field. Personal Gmail will connect through IMAP / SMTP once that's available. Personal Microsoft accounts won't — Microsoft has withdrawn the app-password access that would depend on.
Read the setup step for your provider
Both providers show a one-time setup step before the form.
Google Workspace shows Flinter's OAuth Client ID with a copy button. Your Google Workspace admin needs to add that Client ID as a trusted app in the Google Admin Console before any mailbox on your domain can connect. This is done once per domain, not once per sender — if someone has already done it for your company, skip ahead. Full walkthrough: Whitelisting Flinter in the Google Admin Console. If you're not the admin, copy the Client ID and send them that link.
Microsoft 365 / Outlook covers what to do if your organisation requires an administrator to approve Flinter. Continue and sign in; if your organisation allows it, you're done. If Microsoft shows Need admin approval, see If Microsoft asks for admin approval.
Enter the mailbox details
Enter the sender's Email (required) and Display Name, then click Add & Connect Outlook (or Add & Connect Google Workspace).
Sign in and grant access
You're redirected to Microsoft or Google to sign in and authorize Flinter. On success, you land back on Senders with a confirmation banner.
If you sign in with a different account than the sender's own email address, Flinter rejects the connection with an account-mismatch error — sign in with the matching account and try again.
Whitelisting Flinter in the Google Admin Console
Google Workspace only, and only once per company domain. You need to be signed in to the Google Admin Console as a Workspace administrator, and you'll need Flinter's OAuth Client ID — copy it from the Add Sender dialog in Flinter before you start.
Microsoft 365 senders don't need any of this.
Open API controls
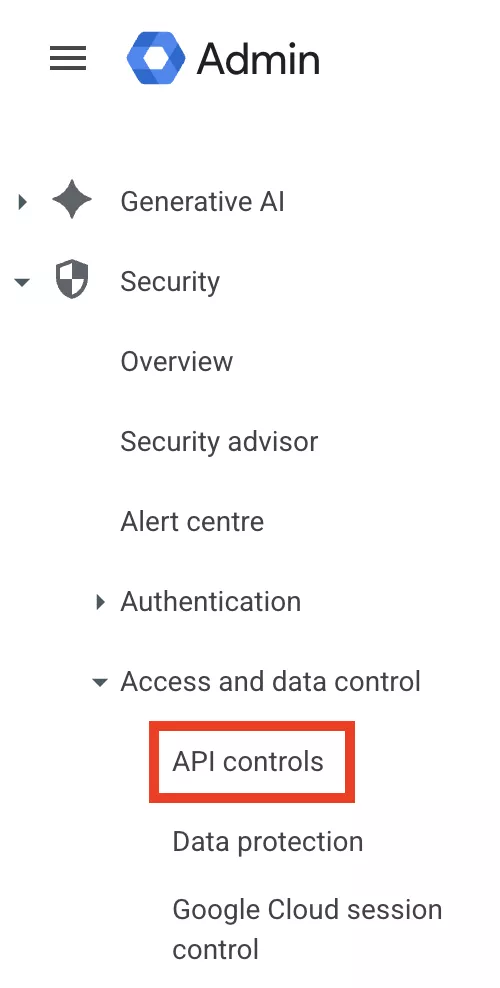
In the Admin Console, go to Security → Access and data control → API controls.
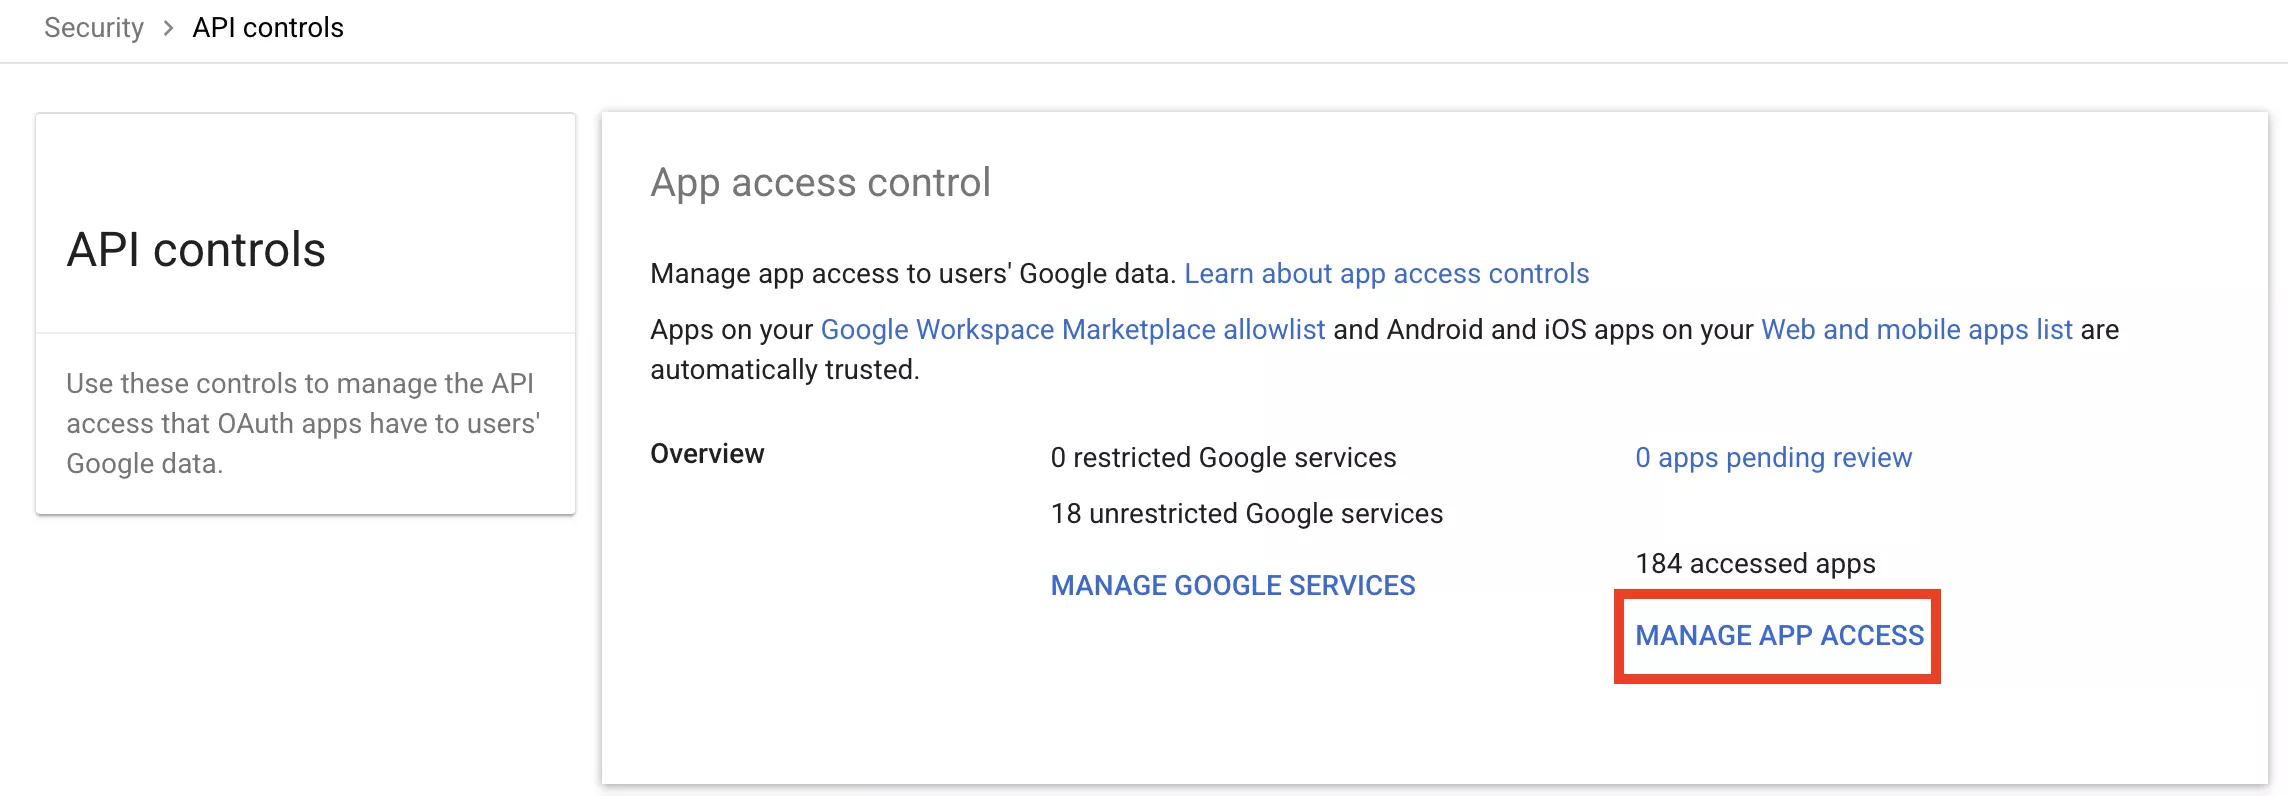
Open Manage App Access
On the API controls page, find the App access control panel and click MANAGE APP ACCESS.
Start configuring a new app
Click Configure new app at the top of the Configured apps list.
Find Flinter by its Client ID
Paste the Client ID you copied from Flinter into the search box and click Search. Flinter appears in the results — click it to select it.
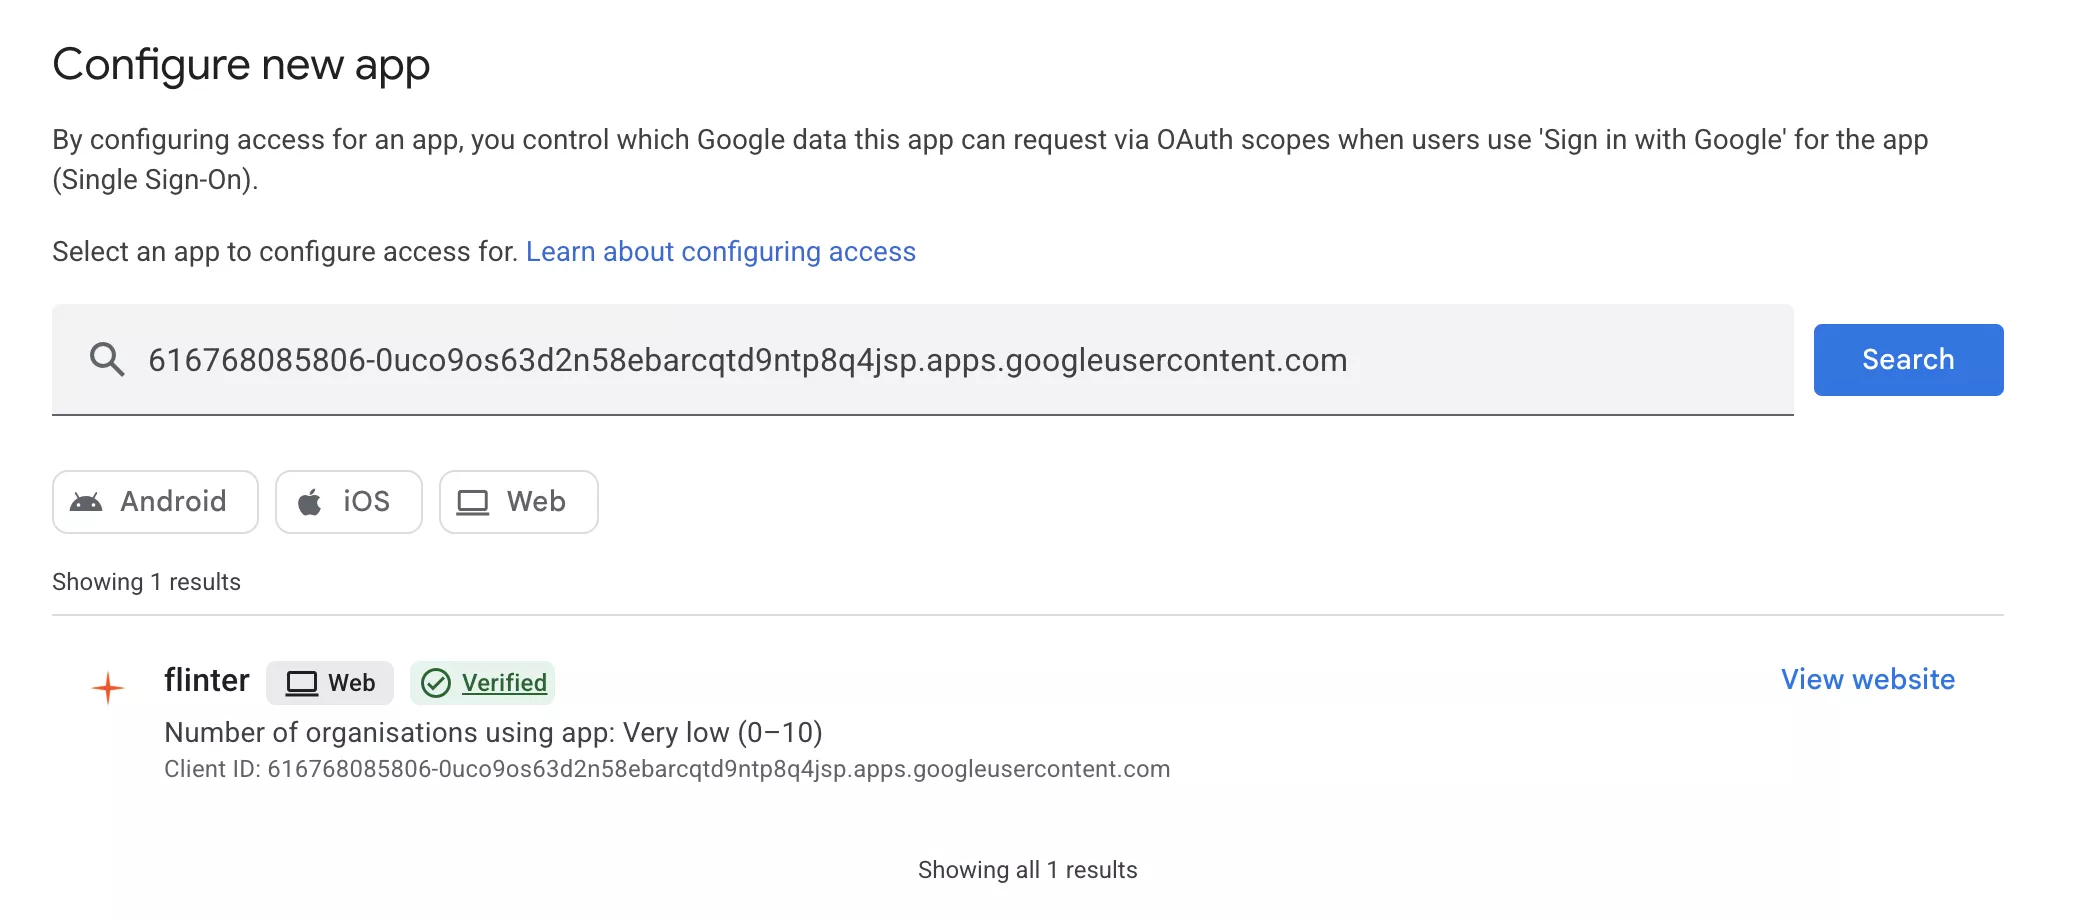
Apply it to all org units
Choose All Org Units, so every mailbox on your domain can connect. Selecting a single org unit works too, but then only users inside it will be able to connect a sender.
Mark it Trusted
Under Access to Google data, select Trusted, then click Finish on the following screen.
Check it's listed
Flinter now appears in Configured apps. That's the whole setup — go back to Flinter and continue connecting the sender.
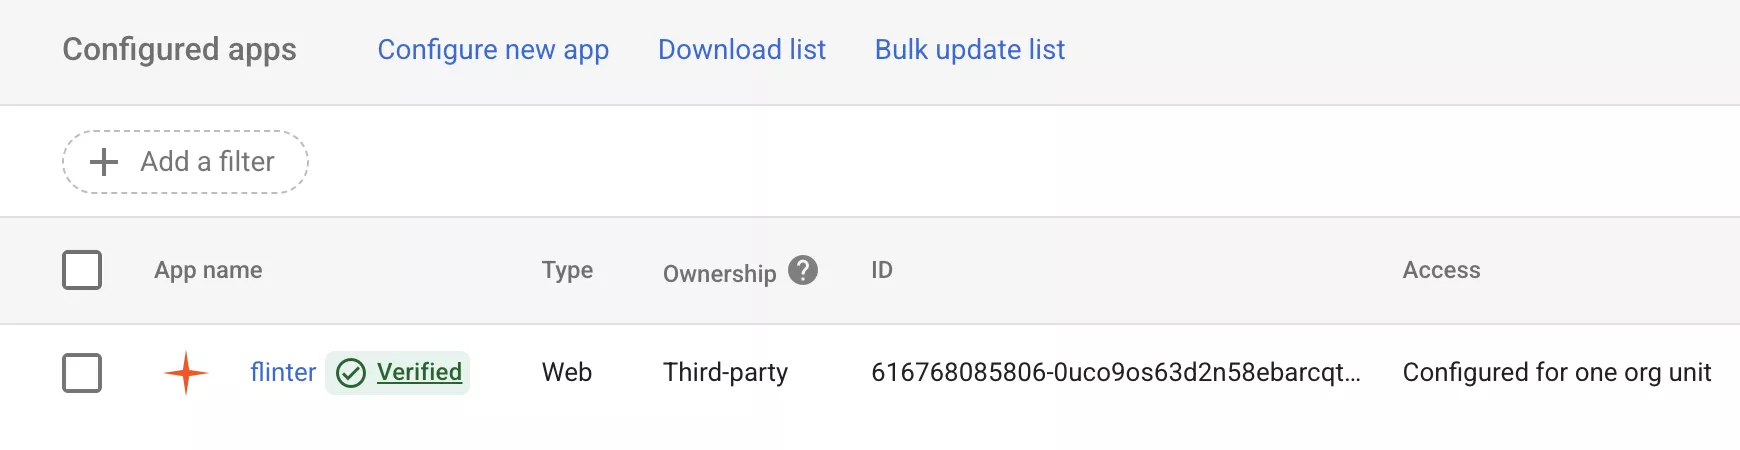
If a connection still fails right after whitelisting, wait and try again — Admin Console changes take a little time to apply across a domain.
If Microsoft asks for admin approval
Some organisations require an administrator to approve any app before it can reach their mailboxes. If you see Need admin approval while connecting an Outlook sender, that is your organisation's own consent policy — not an error, and not something you did wrong.
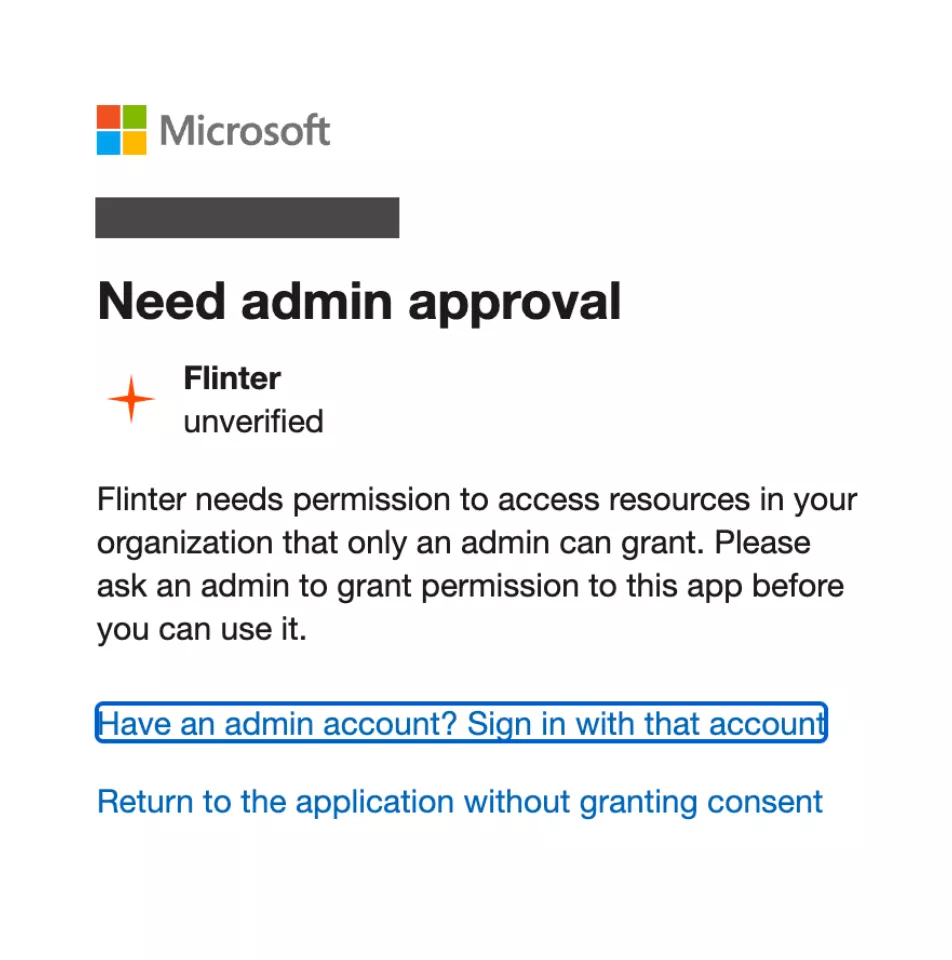
Approval is given once for the whole organisation, not once per mailbox. After it, everyone at your company can connect their own Outlook sender without asking again.
If you are not an administrator, send this page to whoever is.
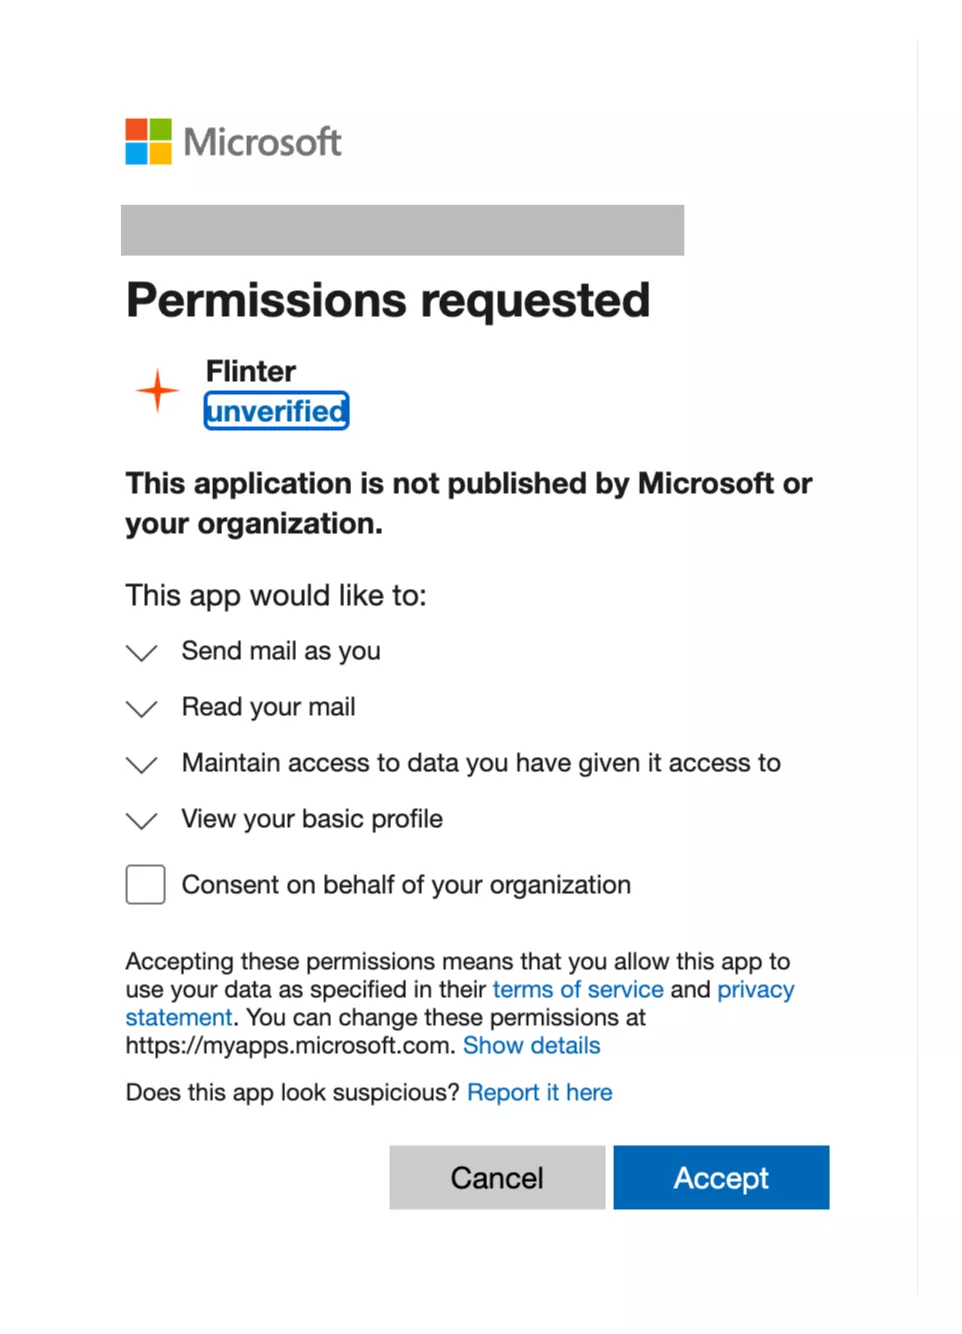
If you are an administrator connecting your own mailbox, you don't need the steps below. Sign in as normal and Microsoft's consent screen shows an extra checkbox, Consent on behalf of your organization. Tick it before clicking Accept and the approval covers everyone at your company in one go — the screen confirms this, saying no one else will be prompted. Leave it unticked and only your own mailbox is approved, so a colleague connecting later still sees Need admin approval.
Open Flinter in the Entra admin center
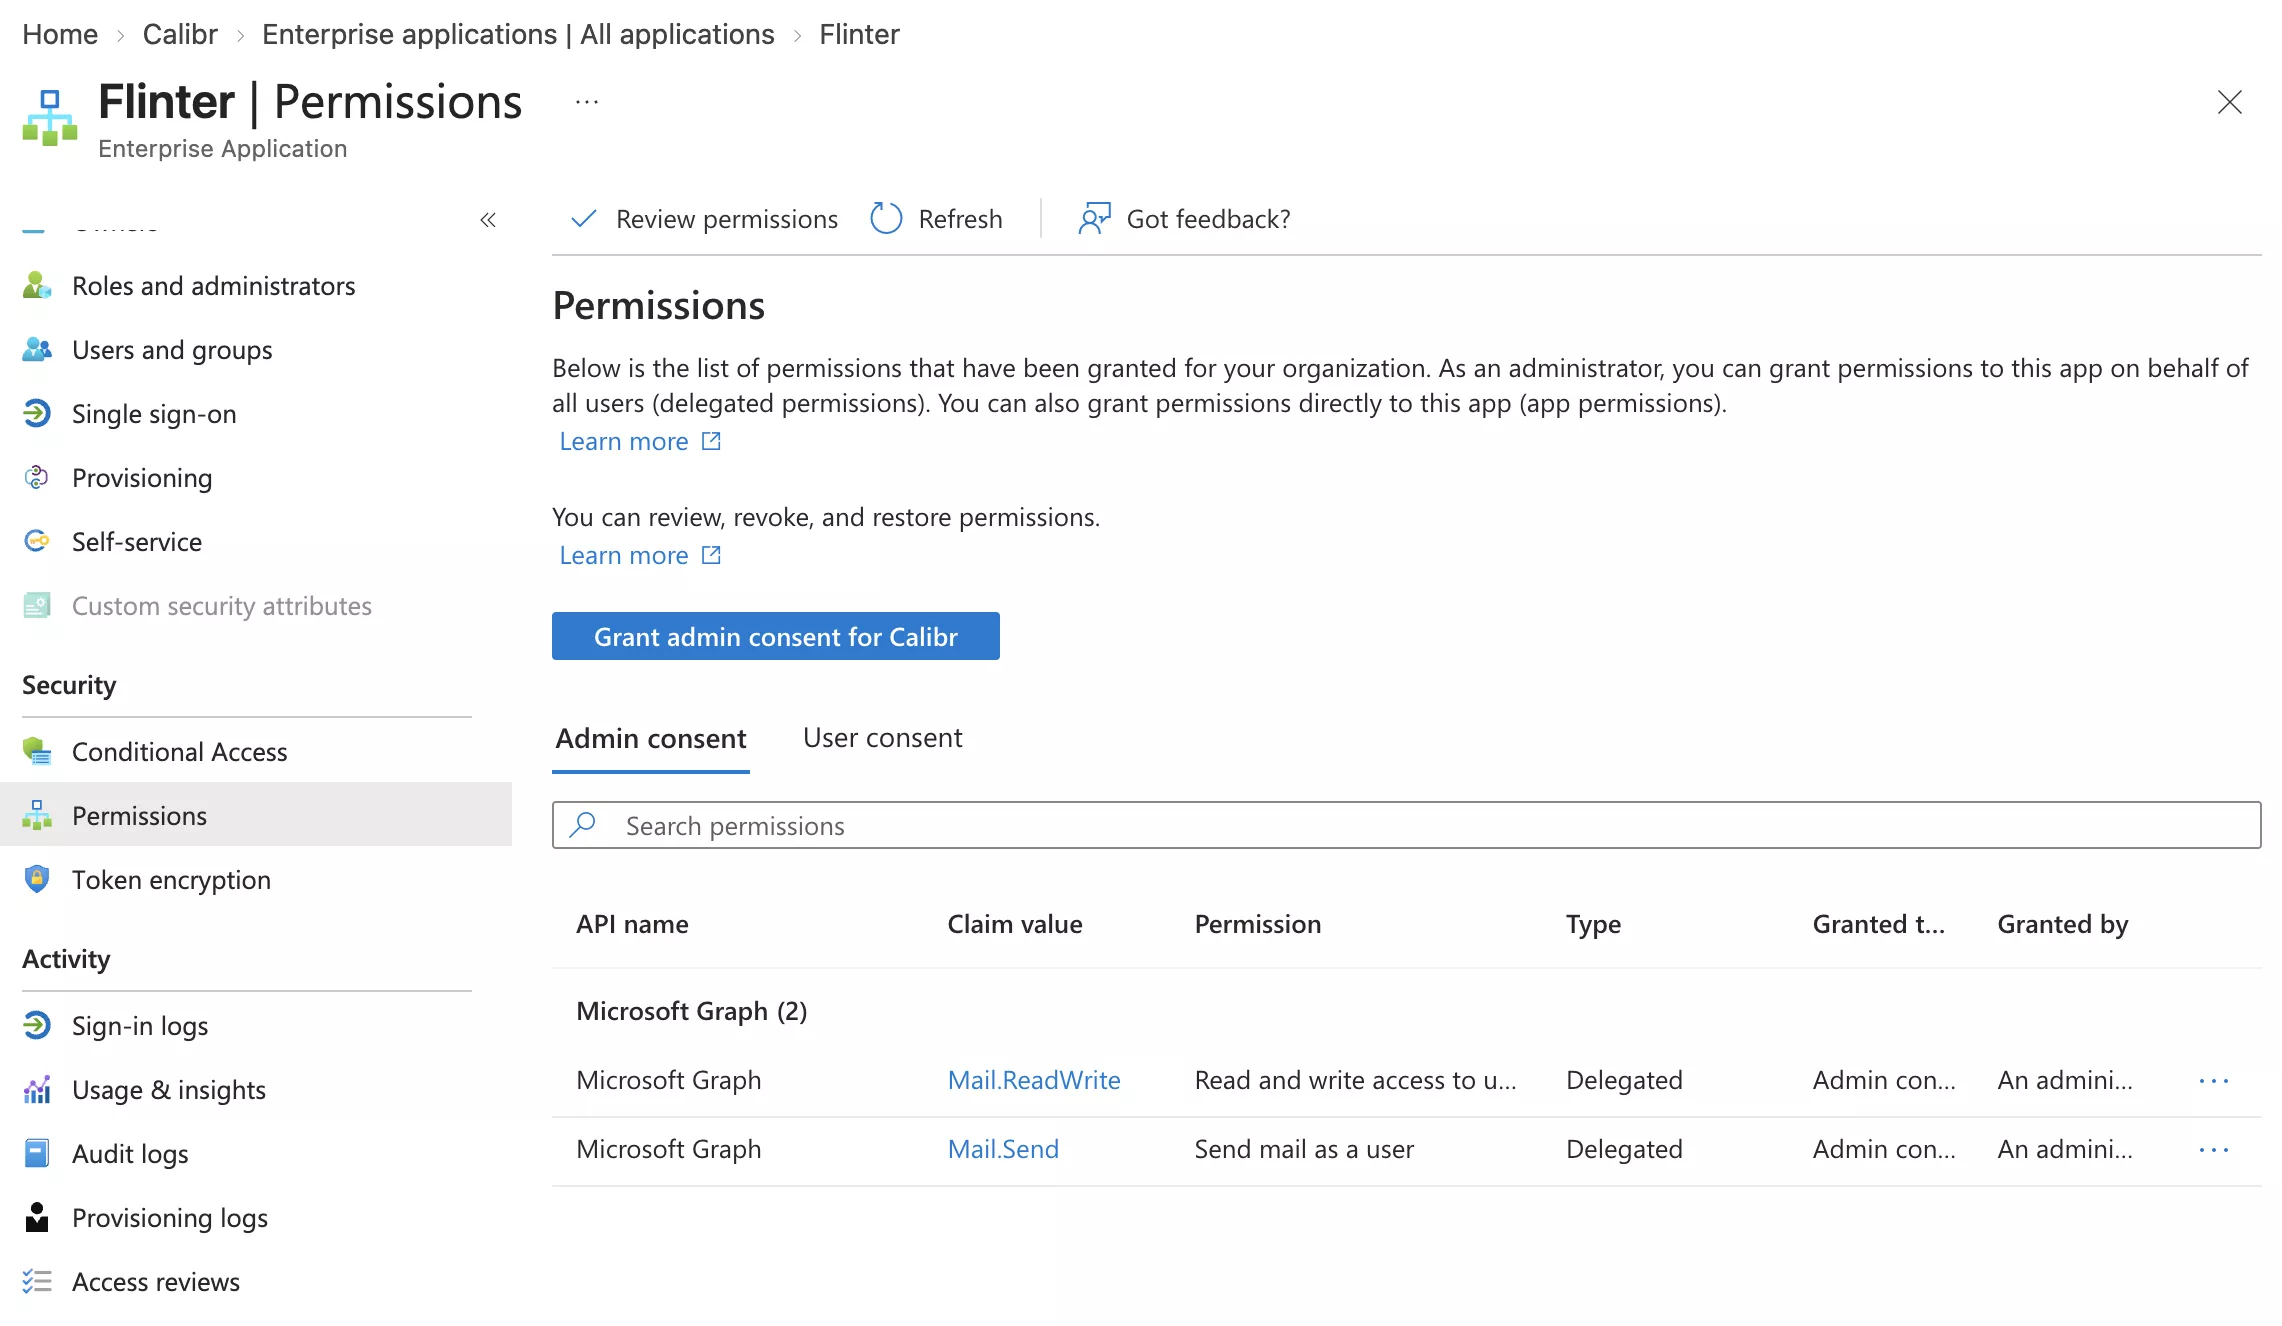
Signed in as a Global Administrator, go to entra.microsoft.com → Enterprise applications → Flinter → Permissions, then click Grant admin consent.
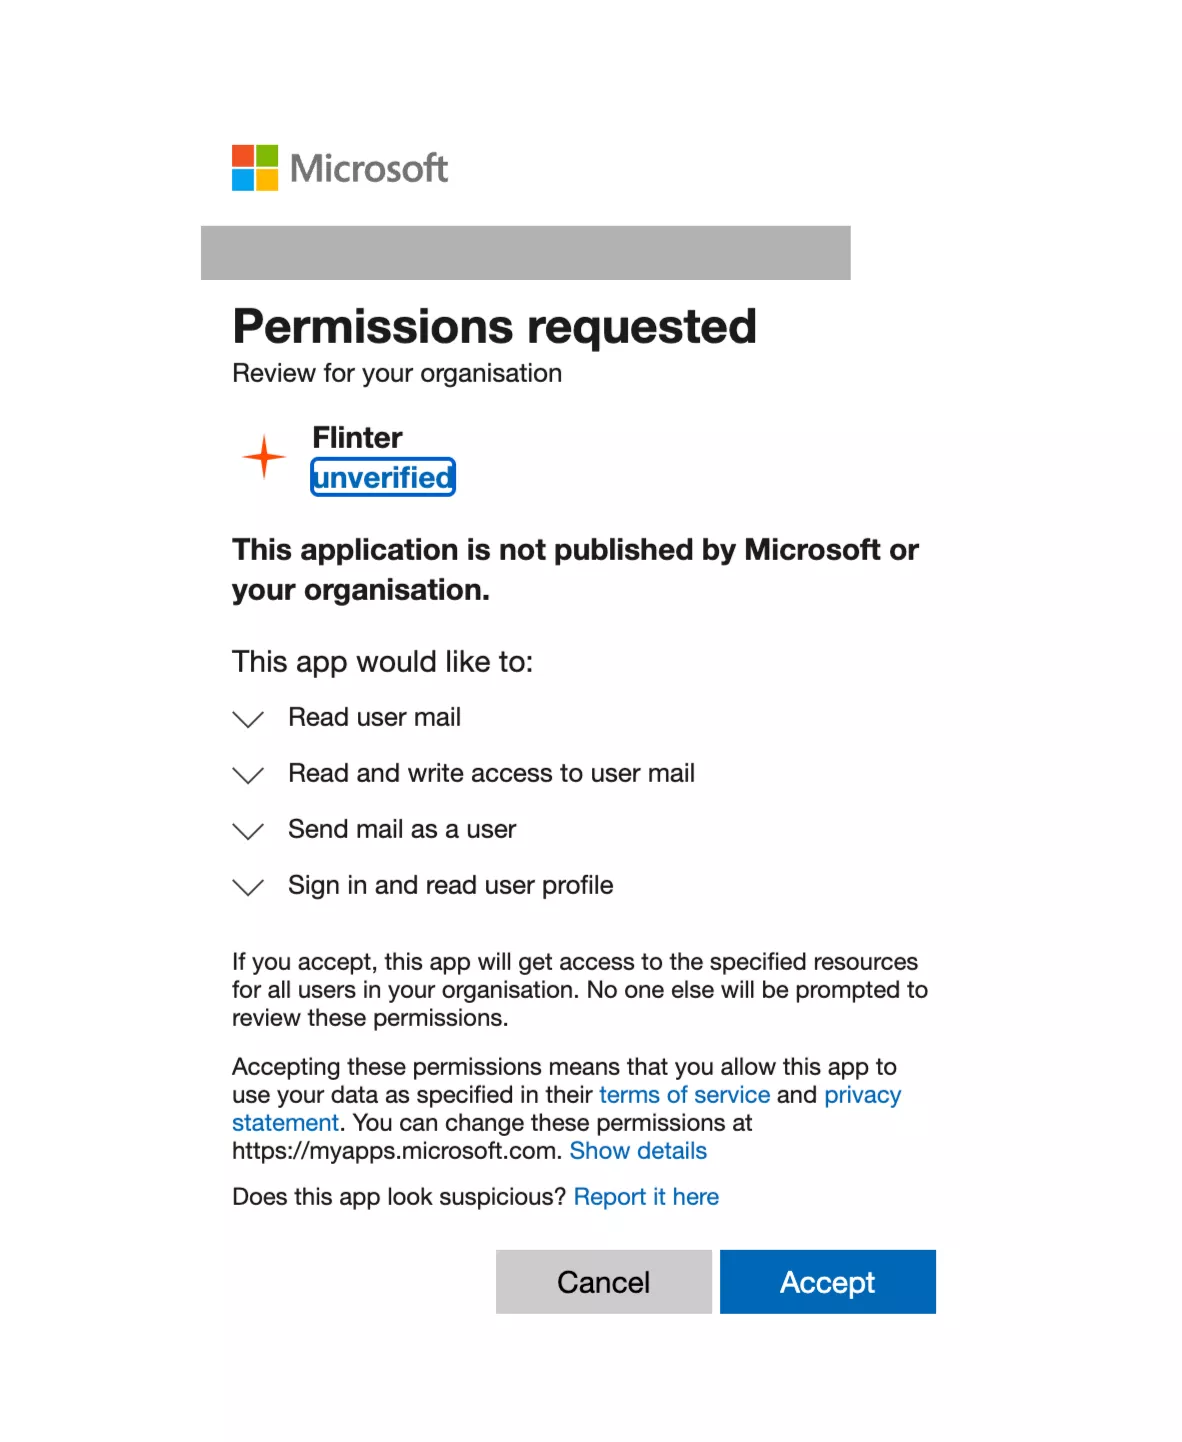
Review and accept
A consent screen opens listing what Flinter is asking for. Check that it says the app will get access for all users in your organisation — that sentence is how you know the approval covers everyone rather than just you — then click Accept.
Connect the mailbox
Back in Flinter, open Senders, click the sender that is waiting, and choose Reconnect Outlook. Sign in as the mailbox you are connecting — not as the administrator, or Flinter will refuse the connection because the account signed in does not match the sender.
There is a second route — the Have an admin account? Sign in with that account link on the approval screen — and it has a trap. The consent screen it opens has a Consent on behalf of your organization checkbox that is unticked by default. Accepting without it approves Flinter for that administrator's own mailbox only, so the mailbox you were actually trying to connect stays blocked. Worse, the prompt will not offer the checkbox again afterwards, because that administrator has already consented for themselves. Use the Entra route above, which has no checkbox to miss.
Microsoft may also ask you to approve a sign-in with the Authenticator app during any of this. That is your own organisation's multi-factor authentication, the same as signing in to Outlook — it is not something Flinter requires, and it does not need an administrator.
Managing a sender
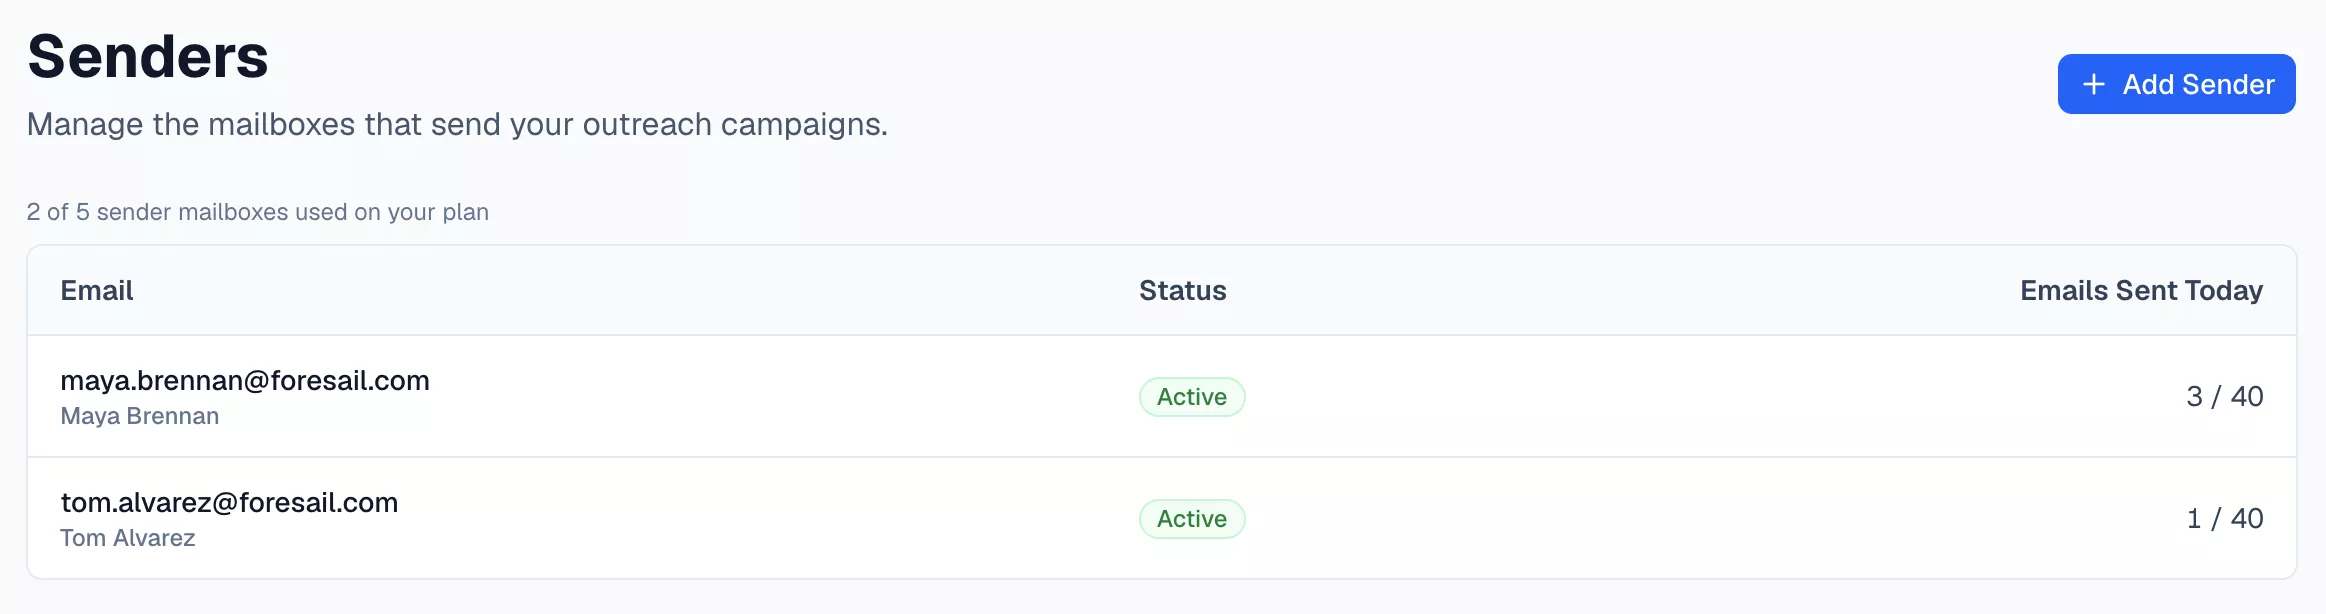
The Senders page lists every mailbox in the workspace with its status and how many emails it has sent today against its daily limit. Click any row to open its settings panel.
Settings tab:
- Display Name — how this sender appears to recipients.
- Signature — appended automatically to every email sent from this sender.
- Daily Send Limit — the maximum emails this sender sends per day; the Senders table shows today's count against this limit.
- Minimum Gap Between Sends — minimum minutes between two consecutive sends from this sender.
Campaigns tab: lists every campaign this sender is currently assigned to, with each campaign's status. A sender not yet assigned to anything shows a reminder to assign it from a campaign's Settings tab — see Campaigns.
Sender status
Each sender shows one of four statuses in the Senders table:
- Active — connected and able to send.
- Pending Auth — created but authorization was never completed.
- Disconnected — was connected, but the connection broke (a revoked token, a changed password).
- Removed — taken out of the workspace. It no longer sends or checks for replies, but its history stays.
Pending Auth and Disconnected senders show a reconnect button in their settings panel — Reconnect Outlook or Reconnect Google Workspace, depending on the provider. Click it to redo the sign-in flow without recreating the sender.
Removing a sender
Open the sender's settings panel and click Remove sender. A confirmation dialog shows what will happen before anything changes.
Its leads are handled differently depending on whether they've heard from that mailbox yet:
- Leads it has already emailed are paused. Sending the rest of their sequence from a different address would break the email thread the lead can see, so Flinter stops rather than continuing from somewhere unfamiliar. Resuming them needs that mailbox connected again — until then Flinter blocks it, since a lead assigned to a removed sender has nothing to send from.
- Leads it hasn't emailed yet can be moved to another connected sender, chosen in the same dialog, and carry on normally. Any connected sender will do; it's added to the affected campaigns automatically if it wasn't on them. If you don't pick one, they're paused too.
Everything the sender already did is kept — its sent emails, replies, and bounces all stay in the Inbox and in your campaign analytics.
Removing a sender stops reply checking for that mailbox, so replies to emails it already sent are no longer picked up by Flinter. They still arrive in the mailbox itself.
If you add the same address again later, it reconnects as a new sender and keeps the history it already had.
Related docs
- Campaigns — assigning a sender to a campaign, and campaign-level send scheduling.
- Getting Started